October 31, 2009

Bee Luscious Product *REVIEW*

I am excited about some of the new products I have tried from Bee Royal Products, which their makeup line is called Bee Luscious. I had heard of their makeup on YouTube and thought I would give it a try.

The first thing I really like about the actual company is that they are family owned, and also provide a lot of natural and organic skin and body care. They are quick to respond and their customer service is great.

So let me talk about some of the things I am going to review:

The Perfect Smokey Eye Kit 

  • Price:  $36.95

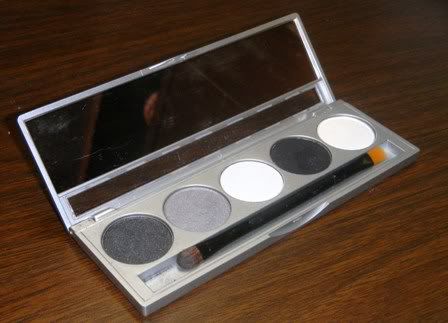
I am very picky about my smoky eye colors. It is hard to find a palette that meets all of my desires. I was pleasantly surprised when I got this palette that it offers: Matte white, matte black, shimmer white, shimmer black, and a nice gray. The packaging is VERY user friendly for everyone, people with disabilities would be able to handle this palette easily, and open it easily. With a quick and easy lift with my fingernail into the front of it and it came right open. However, do not let this fool you into thinking that it is poorly constructed or flimsy in any way. The packaging is very “hearty” and you could slip this easily into a small purse without the worry of it coming open. There is a fine line between being too easy to open, versus coming open easily because it is poor quality and this packaging is the perfect ease, and mix of quality. It has a nice little viewing window when it is closed, so you can see what colors are in the palette. This is nice, because Bee Luscious offers many of these palettes in different colors. It also has a nice little mirror in it, with a little brush applicator. The applicator is a nice feature for touch-ups for me, but I prefer to use my own bigger and fuller makeup brushes for actual application.

Literally my ONLY complaint with this particular palette color lineup is (again remember, I am VERY picky about my smoky eye colors,) is that in my personal opinion the shimmer shades, and the gray (especially the gray) need a bit more pigment. I had to layer a little more than I would have liked. The mattes are perfect. But when I am going to wear these colors I want DRAMA right off the brush!

Luscious Rose Bouquet Blush

  • Price: $37

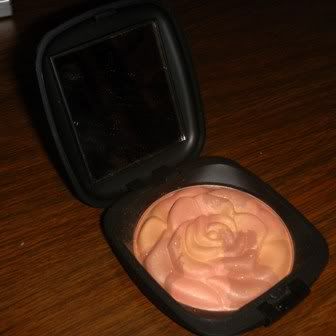
This compact is just beautiful! The shade I got is Maple Leaf. It is a mosaic style blush in a nice 3-dimensional raised rose. I was a bit concerned when I saw the packaging on this because sometimes this style of compact can be difficult to open for a disabled person. Buttons, triggers, sliders etc. to get it to open. This has a simple push button (no flipping or lifting) that engages easily with little pressure. The lid is not a spring hinge, so it won’t come flying open and you would not have to worry about this accidently coming open in your purse or makeup bag. It has a good sized mirror, and again, like the first example above, is very quality packaging.

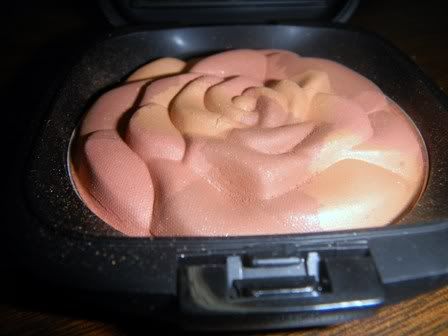
The formula for this blush is very nice and smooth, with plenty of pigment. You get a light amount of shimmer in this blush also.


Micro-Bubble Lipstick

  • Price: $17.25

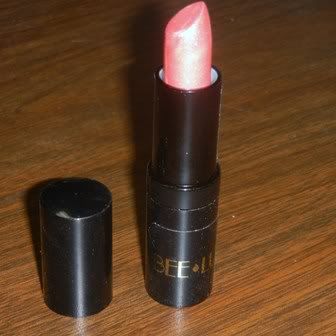
This lipsticks payoff was a little better than expected. As far as general appearance, nothing too fancy about the packaging of this tube of lipstick. Not a whole lot that may set it apart from many other commercial brands. But the lid was not too tight or too loose, so it was easy to open. I didn’t think the color would be very flattering on me. But, I gave it a go anyway. This color is Micro Petal. It does have a little bit of the typical lipstick smell, which doesn’t really bother me. I will say that the payoff is excellent. Goes on nice and smooth, and feels nice on the lips. Bee Royal claims that: 

“Micro-Bubbles continually release conditioners to keep lips soft and color fresh for hours.” 

I did notice that it felt nice after a long period of time, and the color stayed well.

August 19, 2009

Coastal Scents REVIEW – Palettes, Gel Liners, Lip Gloss

Since I could only tape 10 minutes worth of reviews on YouTube, I thought I would elaborate more here. First, here is my video review.

So let me add here. Aside from the makeup being excellent quality, LOW PRICES, and a lot of the eyeshadows in the palettes are comparable to MAC; not to mention the gel liners are AMAZING and I must get one in each color!

Their customer service is A+ and their shipping costs is based on ACTUAL cost, you can choose from USPS to FedEx and all of the shipping options these carriers offer. I cannot stand when I need just one item and have to pay a flat fee (i.e., $5.00) just to ship that one little item. So their shipping prices scores points with me also.

So in my review I really had nothing bad to say at all. Only some recommendations to make their products even better and user friendly.

I am still on the fence with the lip glosses. I need to use them a little while longer. While they are nice, and not too sticky I am just not sure about their staying power as they seem to wear off pretty quickly. Especially the lighter colors which seem to be a thinner formula. I have to say I like the Plum Crazy color. If all of them had the same texture and consistency I feel like they would stay on the lips better. The other colors I have are Odyssey, Oasis, and Strut on Nude.

So overall based on the products I have used thus far, I am VERY pleased. I’d give them 4.5 stars [out of 5].

http://www.coastalscents.com

**Remember: If you place an order with them please mention in the order notes that you heard about them through Misty’s Makeup Reviews!!

August 16, 2009

NOTE: Everyday Minerals Links

My apologies as all of the links and pictures in previous posts for Everyday Minerals are invalid. They did an overhaul on their website. From here on out, all the links should be correct.

Coastal Scents Haul and Tutorial

There will be many more tutorials and more detailed reviews on these products coming later. I specifically will go over such things as packaging, ease of use (especially for disabled people.)

Here is my haul video and my Copper and Gold Eyeshadow Tutorial.

August 13, 2009

Baby Wipes = Best Friend

Just a quick entry here, but I wanted to bring this up as it is a good tip that I have used for YEARS.

There are a lot of face cleaning/makeup removal wipes on the market and they may work well; however, they are expensive!

For years, before they even had such things on the market I have used regular baby wipes for makeup removal/touch up and a few other things. I don’t even buy the name brand wipes, I get the generic wipes found at your local grocery store.

Some people don’t like the smell, but I suppose I have used them so long that I don’t mind and actually like the scent.  Baby wipes can be used in many ways, to remove all of your makeup. Especially your eye makeup. Now, I have had only one friend do this and she said they burned her eyes. Overall the majority of my friends that I have advised to use baby wipes or used them here at my house have not had a problem. They don’t burn my eyes in the least. They will really remove all of that caked on eyeliner and mascara and are very gentle to your eyes.

I recommend to still use a overall facial cleaner on your face after using a baby wipe, but the wipes will do a lot of the major work for you before hand.

Another thing is touch up, there have been many times where I keep a baby wipe on hand, especially if using liquid eyeliner or mascara. I am sure all of us have had that moment where your hand decides to jerk when applying, or you blink and get it underneath your eye. Wrap a baby wipe around the tip of your finger and use it for touch ups.

Finally, if you are using shadows or powders for eyeliner and you want a nice dark crisp line. Take you angled (or whatever eyeliner brush you use) brush and you can dampen your brush with a baby wipe before putting it in the shadow or powders.

So CHEAP and easy and you don’t feel guilty if you have to use more than one to remove all of your makeup!

August 12, 2009

My First Video Tutorial/Review

Wow, so I really have to learn how to trim it down more. I trimmed what I felt I could, so I will have to learn how to just work quicker as YouTube.com only lets you do 10 minute videos. So ahem… I had to break this down into three videos. Sorry! But I do think it’s pretty good for my first one!

Products I used:

FACE

EYES

  • Everyday Minerals – Angel’s Trumpet
  • Coastal Scents88 Ultra Shimmer Palette
  • Urban Decay – Liquid Eyeliner (Perversion)
  • Covergirl – Lash Blast (Black)
  • Maybelline – Black Kohl Pencil Eyeliner
  • Everyday Minerals – Medium Brown (eyebrows)

CHEEKS

  • Everyday Minerals – Soft Bronze
  • Napoleon – Mosaic Highlight
  • Everyday Minerals – Time Share 

LIPS

  • Everyday Minerals – Pink Lemonade
  • Maybelline – Whipped Lip Gloss

August 10, 2009

COMING SOON: Coastal Scents Haul!

I am getting a big haul of Coastal Scents makeup in soon! I will have many different things to do tutorials and reviews on so keep watching! I already have their 88 Ultra Shimmer Palette which is AMAZING!

Here is a summary of the haul:

  • 88 Warm Palette
  • Gel Liners: Deep Plum, Maroon, Silk White
  • Glitter Powders: Fairy Dust, Sterling Glitter Powder
  • Lip Gloss: Strut on Nude, Oasis, Odyssey
  • Brushes: Italian Badger Blender, Black Deluxe Shadow, Chisel Detail Mini Brush, Angled Liner Pro Art Detail Brush
  • 10 Piece Professional Blush Palette
  • New Color: Copper Torch Eye Shadow

August 9, 2009

Make Green Eyes POP!

I learned this on my own, long before they made kits for different colored eyes. I have dark green eyes and some colors of eyeshadow and eyeliner really hides the color of my eyes.

Bottom line is, if you use pink, mauve, maroon, purple, or any variance in between those shades it really makes green eyes stand out, especially if you use as your eyeliner also.

In the first picture
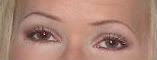
, I used a white all over color all the way up to my brow. Then I used Morocco eyeshadow 
[discontinued] from EDM in my crease and also used it for my eyeliner. Morocco is a nice deep maroon shade which could be easily substituted with a shade like Wallaby from EDM or any other brand. Wallaby has a nice matte finish with no shimmer as the Morocco did.

In the following picture, it is the same concept. However, I used Mystic Night  from EDM. The picture is a bit overexposed and washes out the eyeshadow color. I just LOVE Mystic Night but you must be careful! It highly pigmented color and be very careful to not use too much or trust me, you will end up looking like a streetwalker! You must have a very light hand to apply this one. This, unlike the other color mentioned previously is a shimmer shadow. I used this for my eyeliner also. If you wanted to get REALLY dramatic, you could do black eyeliner on your top eyelid, then on your water line and lower lash line. Then top it off with a shade like Mystic Night.

I really love both of these looks, and every time I wear shades like this I get comments about my eyes.

August 5, 2009

Trying out a few new products

I got in some new products from Everyday Minerals to try out. The majority of my makeup collection is by them.

Let me start by sharing a SCARY before picture:

Ouch! Scary!

  1. Clean, moisturize your face. Then I like to spritz some glycerin/water mix to the face to help set the mineral makeup. The picture above is after those steps have been completed.
  2. Rub a little Urban Decay Primer Potion on your eyelids.
  3. I applied Fairly Light Semi-matte foundation by EDM. I applied it with the Flat Top Brush. I just applied one coat all over. The flat top brush is easier to use for me due to it’s long handle (the older Kabuki brush from EDM has a very short handle) and it seems to give better coverage.
  4. Next, I started working on my eyes. I use either EDM or Coastal Scents for my eyeshadows the majority of the time. Today I used the Coastal Scents because I wanted to try out a video tutorial by emilynoel83 on YouTube where she used the 88 Ultra Shimmer Palette from Coastal Scents. I absolutely LOVE this palette! It has almost any color you could want and they are VIBRANT and no lack of shimmer as labeled. You have to be careful though, one light tap and you can end up with VERY dark eyes. The only thing I do not like about this palette is the packaging. Someone like myself that is disabled it is very hard to open it. I cannot mash down the trigger to release it to open. Any time I want to use it, I need help.
  5. So I completed my eyeshadow (mine came out darker than the tutorial and you cannot see the gold shimmer in my pictures.) Then I used my Almay Liquid Eyeliner for my top lid, just a cheap kohl black for my bottom lash line, and water line. I finished it as the tutorial stated with a purple shade from the 88 Ultra Shimmer Palette.  Then I added my mascara.
  6. Ok, moving on to some new things. Today I got in some new products from EDM. I got their Soft Bronzer 
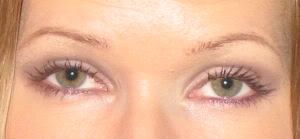
which can be found in the cheeks section of their website. I applied this under my cheekbones and then a little all over. Very little! I was afraid to get it too dark and look unnatural since I am fair complexion. It did seem to give my face a little extra color that I need. It IS very “soft” in color so you would have to really apply way too much for it to look bad, I believe.
  7. Then the bronzer wasn’t quite enough color to get away with using alone for me. So on the apples of my cheeks I applied a new blush I got from EDM called Time Share (one of their newer spring colors.) I absolutely LOVE this color! I was a bit hesitant to get a blush again because the previous two colors I got ended up not being complimenting shades for me. This is a really nice “mauvy” type shade with not too much pink or red. Very natural looking.
  8. I then finished with my new finishing powder from EDM, Sunlight Finishing Dust. The formula on this seems much better than what I had been using previously that is now discontinued. This seems more translucent and light weight. So it does its job and nothing more. You don’t want to feel like you are applying LAYER after LAYER of powders on your face. This really took any shine away, blended everything together nicely, and gave a soft glow to your face. BEAUTIFUL!
  9. Last but not least, I tried out my new Pink Lemonade lip gloss. I love the design of the package like chapstick, the texture of the lip gloss feels nice and has a healing like feel to it. However, this particular color is not for me. It had a real 70s iridescent pink look to it. I would like to try out some other colors though. I won’t give up after one shot, although I didn’t care for the previous two colors I got in the pots from EDM a long time ago either.  But we will see, I just may not have found the right shade. I have no complaints about the lip glosses aside from that, but I would like a little more “gloss” for the glosses. I ended up topping it off with some unnamed lip gloss to rid some of the color and give it a little more shine.

Here is the final results, I will have to work on my webcam picture taking skills, sorry you cannot really appreciate the colors.

193726194306193830-2

August 3, 2009

My Makeup Application Regimen

First and foremost start off with a nice clean face. I apply St. Ives Collagen Elastin Facial Moisturizer then let that set and soak in for about 10 minutes. After the moisturizer has soaked in I apply either the homemade glycerin mix spray to my face, or if I am going out for a night on the town where my makeup must look FAB all night, I apply the Smashbox Photo Finish. Let that set before applying the foundation for about five minutes.

Then for the final prep step I use the Urban Decay Primer Potion. I have always had issues with eyeshadow fading, creasing, or my eyelashes leaving  black smudges on my lids. This stuff is AMAZING! It makes your eyeshadow more vibrant, it will last for days if you let it. I have done the big “no no” and slept with my makeup on. I have woken up with my eyeshadow looking the same as it did the day/night before! Never had a single crease or eyelash smudge. I will never go without this.

Now your face is prepped and ready for application. Just like painting you have to have an appropriate prepped surface.

For my foundation I use, Everyday Minerals Fairly Light which is in the Beige category on the website. I have used both the matte formula and am currently using the semi-matte. I like them equally. I apply this with my Flat Top Brush from Everyday Minerals.  Versus the regular Kabuki Brush this just seems to give you a little more coverage for foundation. After I apply my foundation I apply the blush of my choice. Then I began working on the eyes which always takes the longest. I normally apply a white shimmer eyeshadow to the entire eye all the way up into brow. I really like the pearly look for highlights. I purchased Floating Feathers from EDM. You can apply it lightly to have just a light semi-translucent sheen or apply it heavy to give you a stark white, pearly shade.

Once I am done with the last step, I then fill in my eyebrows. On this I have no huge preference and sometimes will use eyebrow pencils, and sometimes use powder eyeshadow in a medium brown color. I am a blonde so my eyebrows are really light. I do this step after applying the Floating Feathers to my eye because if I get some white in my eyebrow I can cover it up. I do not like to get the white in my brows after I have just worked to get them filled in nicely.

I apply my eyeshadow after this. I am not going to go into extreme detail on this in this post because I change colors and techniques frequently depending on the look I want.

Next step is eyeliner. For eyeliner I typically use either liquid eyeliner like Almay Liquid Eyeliner in Black. This isn’t as forgiving as using the mineral eyeshadows for liners. However, you get a very bold, crisp look that won’t smudge. But if your eyes water… watch out! This will run like ink! So use something like this according to where you will be and what you will be doing. Don’t suggest this for going to see a sad movie, but do suggest for going out to a night club.

When I want a smoky look and/or do not want to take the time and precision of liquid eyeliner, I used a darker shade of eyeshadow, preferably a mineral shadow. You can still make you eyeliner pretty bold and crisp by dampening your brush (I use an angled eyeliner brush – no brand in particular) before putting it in the shadow. You can dampen it easily with a baby wipe, or a mixing agent.

I only use pencil liners for my waterline. They just don’t seem to apply as easily; or stay as well as liquid liners and eyeshadow liners.

It is always wise to have a complimenting eyeshadow color to whatever eyeliner you use. This is because no matter if you use liquid or pencil, it is a good idea to go over it with a shadow to set it. Sometimes I apply a little of the Floating Feathers to the tear duct inner corners of my eyes and maybe sweeping a little toward my eyeliner on the bottom. This just brightens your eyes a bit.

Next is mascara, nothing special here. I use L’oreal Paris: Telescopic Mascara. I like this because the brush is kind of a cross between a comb and a brush. It seems to separate nicely and really bring my lashes up and out.

I next move on to the final steps. First I would apply a nice finishing powder to my mineral makeup. I used to use Silk Dust Tinted by EDM but that has been discontinued. So I will be ordering some of their Sunlight Finishing Dust to try out. I also will be ordering some Soft Bronzer  just for those days I want a little extra color or definition.

Then I use a little cheekbone highlight powder to give me a little sheen and lighten. I use Mosaic gleamer by Napoleon Perdis.

Finally! Last step I promise! I apply my lipstick. The lip gloss tubs that EDM used to have I had purchased a couple of colors. I got the Natural color and a Plum color (I don’t remember the name) but these tubs have been discontinued and I didn’t really care for either of the colors. I really am not a huge fan of lipsticks that you have to apply with a brush. Now EDM has new lip glosses in a stick type form. I am going to order the color Pink Lemonade. I will be sure to post what I think about it. So with lipstick or gloss I don’t really have a brand preference as of now. But I tend to go for natural, pink or neutral shades. Not all of us blondes can pull off a lot of color on the lips like Gwen Stefani! I believe that dark or color rich shades draw attention away from your eyes and I typically like most of the focus on my eyes (since I work so hard on them!) I also tend to believe that lighter shades as mentioned tend to make your lips look fuller in most cases.

Do one quick spray of homemade glycerin mix and call it a day. Now I know all of this seems like a LOT of steps. However, once you get in a routine it normally don’t take too long. When it is all written out in detail it seems a lot longer than if I was to do a tutorial video. Thank you and there will be a lot more blog entries to come more specific on certain products, shades, and more in depth reviews.

Mineral Makeup Overview

Welcome to my new makeup review blog. I talked about my favorite makeup companies on my personal blog, along with many forums and networking sites. So I have decided to start a blog solely devoted to makeup product reviews.

Two years ago I saw a thread on a jewelry forum talking about makeup. There was a lady talking about Everyday Minerals and that they offered a free sample pack (you just paid for shipping.) I had always wanted to try out mineral makeup, but the big name brands like Bare Minerals, I simply could not afford. So for a small shipping fee I was able to try out three sample sized foundation colors, blush, and concealer. This is a great way to start with mineral makeup; especially when buying online, as it is hard to determine the colors to get the right foundation shade.

In the foundations they have four different formulas:

  • Intensive – Extra coverage
  • Matte – Radiant without shine
  • Semi-matte – A soft luminous touch
  • Original glo – Healthy dewy glow

I purchased the Matte for my foundation.

Of course I couldn’t stop there and also had to order a few other items. If I recall correctly, I got some eyeshadows, an additional blush, a couple of the tub lip glosses (discontinued), the Kabuki brush (back then it was just a “baby brush” with a short handle and I believe it has been discontinued.)

Once I got in my makeup I immediately had to try it. I was in LOVE! I loved the coverage, the finish, the natural look and feel. The only thing I didn’t like was the handling of the powders and the containers. Back then, they didn’t have the sifter tops. So when you would open them, the fine powders would fly everywhere! Being disabled and having strength and dexterity problems this was a little hard to get used to. However, over time I learned how to handle it better and would put a paper towel in lap to catch any fallout from the containers.

I also had to learn how to apply it correctly. At first, I was loading way too much on the brush and then just sweeping it over my face. Powder would fly EVERYWHERE!

MINERAL MAKEUP TIP 1: The best way to use your mineral makeup is to tap a SMALL amount of the powder into the lid. For foundation gently press and swirl the brush around in the lid. I learned to kind of tap and pack it into the brush, and then tap it onto my face before using the sweeping or rotating motion.

For eyeshadow, the general rule above applies, minus the swirl of the brush. Then tap it onto your lid to kind of pack it on before blending to prevent fallout onto your face.

Sometimes, I would apply my foundation too thick. By the end of the day my face would look cakey, or powdery. This is peoples biggest complaint when using mineral makeup. However, it is all just a learning process and this can be the fault of improper application.

MINERAL MAKEUP TIP 2: You can buy a little spritzer/spray bottle from a craft, makeup, or general store. Get a bottle of glycerin which can be found at most grocery or craft stores. Mix 1 part glycerin to 8 parts water. Shake well, and spritz this on your face before applying mineral makeup, and after.

This sets the makeup and gives your mineral makeup and all over smooth, creamy look. Of course the BIG key is be sure to start with a clean face, and moisturize before applying.

You can carry the glycerin mix with you and spritz your face whenever you need a touch-up. Be sure to only make VERY SMALL portions of the mix; however. It starts to separate and go bad in a very short period of time.

MINERAL MAKEUP TIP 3: If you don’t mind spending some money on a great product, I recommend Smashbox Photo Finish as a primer for your makeup. My understanding is that this doesn’t agree with everyone’s complexions with sensitive skin.  But it is amazing for me! It fills in any imperfections in your skins and it feels like velvet when you put it on. A little will go a LONG way.

Anyway, to get on with it… I have used Everyday Minerals ever since the first day I tried my sample kit. Their prices are amazingly low, they are based right here in good ole’ Austin, Texas (they have to be a great company right?) and their customer service is incredible. Their shipping is low and they ship quick. I cannot say enough good things about them. Now I just need to get more products to give you a detailed review of each one!